Tutorial: Getting started
This guide will help you get set up to use Galv. You’ll create an account, set up a Lab and a Team, and configure a Harvester to start collecting data.
Once you’ve done that, you’ll use Galv to add metadata and create datasets you can export.
Creating an account
Go to the Galv Frontend and create an account. You do this using the ‘sign up’ button in the top right corner of the page.
Fill in your details and click ‘Sign up’. You’ll be sent an email with a code to verify your account. Enter the code on the verification page to complete the process.
Creating a Lab
The first thing we need as a user is a Lab. Normally, you’ll join someone else’s Lab, but for now, we’ll create our own.
Click on the ‘Labs’ tab in the navigation bar on the left. You can expand the bar to see the icon names by clicking the hamburger icon in the top left corner of the page.
On the Labs page you’ll see a description of what a Lab is. If you belonged to a Lab, you’d see it listed here.
Click the ‘Create Lab’ button to create a new Lab.
A Lab needs a name, so enter one in the ‘Name’ field. You can also add a description if you like.
A Lab also needs an Administrator. You’re the first user in this Lab, so you’ll be the Administrator. Select your username from the dropdown list.
Click the green floppy disc ‘save’ icon to create the Lab.
You will now see your Lab listed on the Labs page. You can click the ‘+’ icon to expand the Lab and see more details.
Creating a Team
Now that we have a Lab, we can create a Team. A Team is a group of users who work together on a project.
Click on the ‘Teams’ tab in the navigation bar on the left. You’ll see a description of what a Team is. If you belonged to a Team, you’d see it listed here.
Click the ‘Create Team’ button to create a new Team.
Enter the name of your Team in the ‘Name’ field. Select your Lab from the dropdown list.
We can add users as Team members or Team admins. For now, we’ll just add ourselves as a Team admin. Select your username from the dropdown list in the ‘Team Admins’ field.
Click the green floppy disc ‘save’ icon to create the Team, and you’ll see your Team listed on the Teams page.
Creating a Harvester
Now that we have a Lab and a Team, we can create a Harvester. A Harvester is a tool that collects data from a source and stores it in Galv.
Click on the ‘Harvesters’ tab in the navigation bar on the left. You’ll see a description of what a Harvester is. If you had any Harvesters, you’d see them listed here.
Harvesters can only be created by a Lab Administrator. Any Team in the Lab can use a Harvester once it’s created.
There’s no ‘Create Harvester’ button on the Harvesters page. This is because Harvesters are created by running a Python script on the machine where the data is stored.
When we create the Harvester, we’ll need to know the URL of the Galv API, and we’ll need an API Token to authorise the creation of the Harvester.
The URL of the Galv API is shown in the text at the top of the Harvesters page.
Getting the API Token
You access your API Tokens through your user profile. Click on your username in the top right corner of the page to open the user menu. Click on ‘Tokens’ to see your API Tokens.
Click the ‘Create Token’ button to create a new API Token.
Give your Token a name, set its expiry for 3600s (1 hour), and click ‘Create’. You’ll get a once-only chance to copy the Token to your clipboard. Do that now.
Creating the Harvester
Go to the machine where the data is stored and open a terminal. Run pip install galv-harvester to install the Galv Harvester Python package.
Installing the package gives you the galv-harvester command. Run galv-harvester –help to see the options.
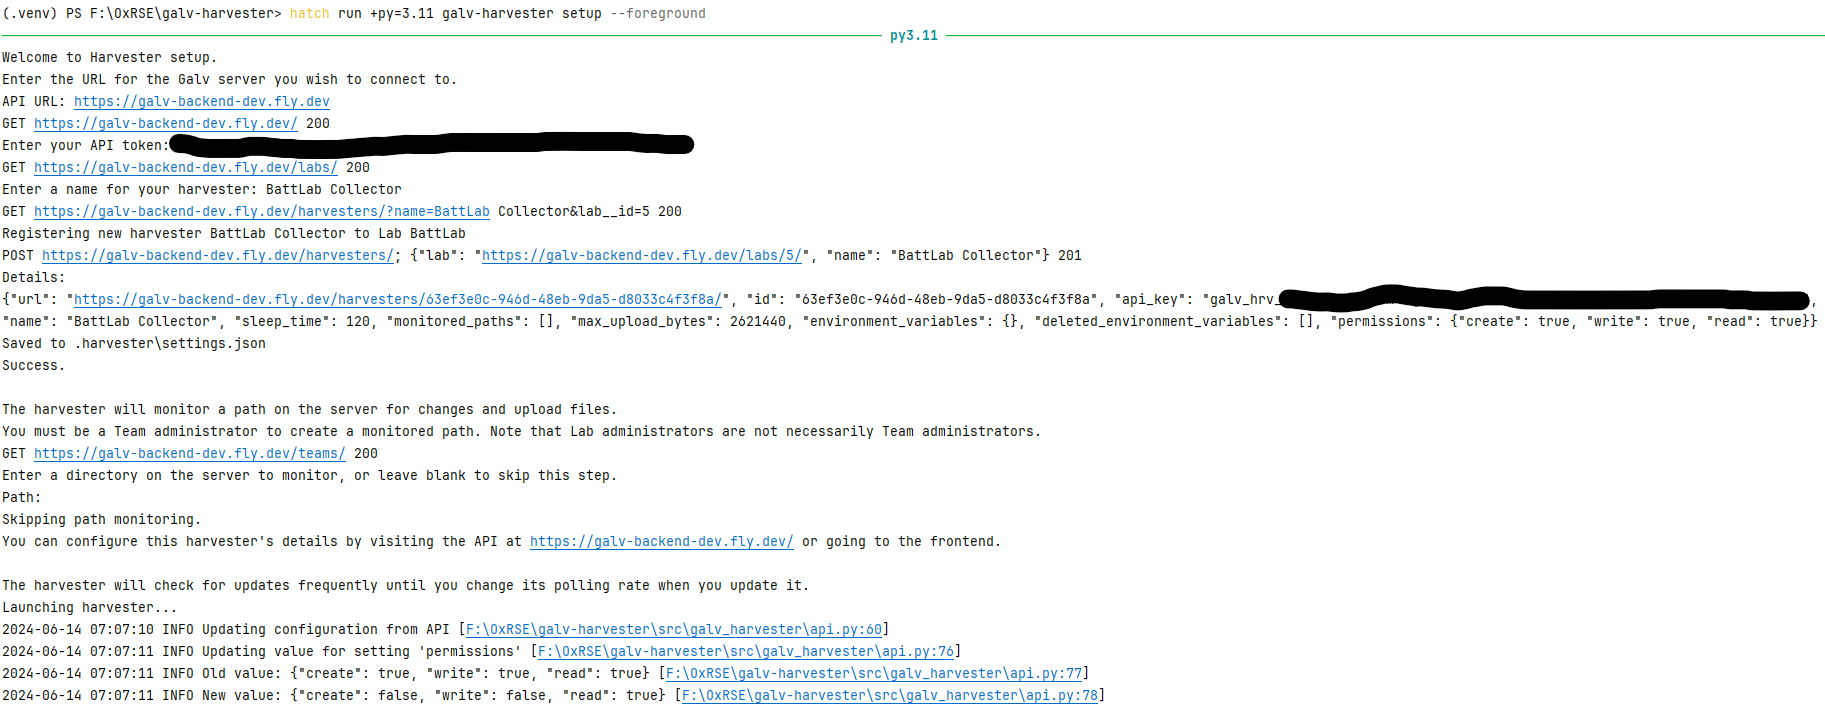
We want to set up a Harvester, so run galv-harvester setup. You’ll be prompted for the URL of the Galv API and your API Token.
Enter the URL of the Galv API and your API Token when prompted. You’ll be asked for the name of the Harvester. Enter a name for the Harvester and press Enter.
That is enough to create the Harvester. You’ll be prompted to create a Path for the Harvester to find data, but we’ll do that using the Frontend, so press Enter to skip that step.
You can see what the setup process looks like in the image below.
Once the Harvester is created, you can close the terminal and it will continue running in the background.
Go back to the Frontend and refresh the Harvesters page. You’ll see your Harvester listed there.
The Harvester in action
The Harvester is now running and collecting data. For the Harvester to work, you need to create a Path for it to find data.
Click on the ‘Paths’ tab in the navigation bar on the left. You’ll see a description of what a Path is. If you had any Paths, you’d see them listed here.
Click the ‘Create Path’ button to create a new Path.

We’ll need to enter the following information:
The absolute path to the directory where the data is stored.
A regular expression to match the files we want to collect. I used .* to match all files.
The time a file must be unchanged before it’s collected. This is useful for files that are being written to.
Whether the Path is active. If it’s not active, the Harvester won’t collect data from it.
How many lines of data should be stored in each dataset partition. This is useful for large files.
The Harvester that will collect data from this Path.
The Team that will own the data collected from this Path.
Once you’ve entered the information, click the green floppy disc ‘save’ icon to create the Path.
The Harvester will now collect data from the Path you created. Let’s wait a few minutes for the Harvester to collect some data, then go to the Files page to see what it’s collected.
Viewing the collected data
You’ll see the data files that have been Harvested listed on the Files page. Initially, all the files will be marked as ‘GROWING’.
Once the Harvester has seen that they are stable, they will be imported. You can see the status of the files change from ‘GROWING’ to ‘IMPORTING’ to ‘IMPORTED’.
Galv renames some columns in the data files to make them easier to work with. This process is called ‘mapping’. You can create your own mappings or use the default mappings provided by Galv.
Where there’s a mapping that works best for a particular file, Galv will automatically use it to import the data. Hopefully you’ll see some files imported and mapped on the Files page. They should be accompanied by an image that shows a preview of the data.
You can click on the File to see the data in more detail, and download the dataset.
To download the dataset, expand the card for an IMPORTED File, click one of its ‘Parquet partitions’, and then click the ‘Download’ button. You’ll see that some columns have been renamed to match Galv’s naming conventions: ElapsedTime_s for the primary time column, and Voltage_V and Current_A for the primary data columns.
Data are only as good as the metadata that describes them, so let’s add some metadata to the dataset.
Managing resources
Resources in Galv are things that hold metadata about datasets. They refer to things in the real world that are associated with the data.
Let’s add some metadata to describe one of the experiments whose data we collected. We’ll describe the Cell, the battery cycler, and the Schedule that the data came from. Then we’ll package it into a Cycler Test to group the data and metadata together, and finally we’ll add the Cycler Test to an Experiment to show how it fits into the bigger picture.
Adding a Cell
Click on the ‘Cells’ tab in the navigation bar on the left.
Cells, like Equipment and Schedules, belong to ‘families’. Families are a way of grouping similar resources together. You will have done your experiments on a particular physical cell, but that cell will probably have many others that are similar to it.
Let’s start by creating the family that our cell belongs to. Click the ‘Create a new Cell Family’ button to create a new family.
You’ll have several fields to fill in. You can hover over a field to get more information about it, and you can see at a glance that any field with * before it is mandatory. If there is information that you want to associate with the family that isn’t covered by the fields, you’ll be able to add it later as a ‘custom property’.
Once you’ve filled in the fields, click the green floppy disc ‘save’ icon to create the family.
Now that we have a family, we can create a Cell.
Click the ‘Create Cell’ button to create a new Cell.
Because we supplied most of the information about the cell when we created the family, all we need to do here is select that family, put in the cell identifier (usually a serial number), and associate the Cell with our Team.
Once you’ve filled in the fields, click the green floppy disc ‘save’ icon to create the Cell.
Custom Properties
Custom properties are a way of adding extra information to a resource.
Click on the pencil icon to edit the Cell you just created. You’ll see all the information you entered when you created the Cell, as well as all the properties that are inherited from the family.
You can change the identifier or family if you need to under ‘Editable properties’, and you can add custom properties under ‘Custom properties’.
Enter a name for the custom property in the ‘+Key’ field. You’ll see a dropdown list of types you can use for the value. By default it’s set to ‘string’, but you can change it to a different type if you need to. All the resource types are included, too, so you can have custom properties that are references to other resources. Once you’ve selected your type, enter an appropriate value in the ‘value’ field, and click the green floppy disc ‘save’ icon to add the custom property.
Adding Equipment and Schedules
You can add Equipment and Schedule resources in the same way you added the Cell. Click on the ‘Equipment’ or ‘Schedules’ tab in the navigation bar on the left, create a family, and then create the resource.
Creating a Cycler Test
A Cycler Test is a way of grouping data and metadata together. It’s a way of saying ‘this data came from this experiment’.
Click on the ‘Cycler Tests’ tab in the navigation bar on the left. Click on ‘Create Cycler Test’ to create a new Cycler Test.
Select your Cell, Equipment, and Schedule from the dropdown lists. You can also add a File that holds the data from your test if it’s been harvested. Associate the resource with your team, and then click the green floppy disc ‘save’ icon to create the Cycler Test.
Creating an Experiment
An Experiment is a way of grouping Cycler Tests together. It’s a way of saying ‘these tests were all part of the same project’.
By now the interface should be familiar to you. You can associate yourself and other users with the Experiment by adding them as Authors. You can select any number of Cycler Tests to associate with the Experiment. Once you’ve created the Experiment, you can add any custom properties you need.