Documentation
This is a placeholder page that shows you how to use this template site.
This section is where the user documentation for your project lives - all the
information your users need to understand and successfully use your project.
For large documentation sets we recommend adding content under the headings in
this section, though if some or all of them don’t apply to your project feel
free to remove them or add your own. You can see an example of a smaller Docsy
documentation site in the Docsy User Guide, which
lives in the Docsy theme
repo if you’d like to
copy its docs section.
Other content such as marketing material, case studies, and community updates
should live in the About and Community pages.
Find out how to use the Docsy theme in the Docsy User
Guide. You can learn more about how to organize your
documentation (and how we organized this site) in Organizing Your
Content.
1 - Overview
Galv is a Metadata Secretary for Battery Science. It helps you manage your battery experiments.
You can start exploring Galv by diving into the demo instance at https://galv-frontend-dev.fly.dev/.
What is it?
Battery science is a complex field.
You’ll have collected a lot of data on a lot of different cells, probably of different types.
You’ll probably have used a variety of equipment to collect that data.
And all that data might be in many different formats.
Galv helps you manage all that complexity.
It helps you keep track of the cells you’ve used, the equipment you’ve used, and the schedules you’ve run.
It helps you package all that data and metadata together, and it helps you keep track of how it all fits together.
When it’s time to collaborate, share, or publish your work, Galv is there for you.
Collaborate and share resources within Galv immediately, or export your data and metadata in a format that’s easy to share with others and archive for publication.
Where do I start?
Check out the Getting Started guide to get set up with Galv.
2 - Getting Started
What does your user need to know to try your project?
This is a placeholder page that shows you how to use this template site.
Information in this section helps your user try your project themselves.
What do your users need to do to start using your project? This could include downloading/installation instructions, including any prerequisites or system requirements.
Introductory “Hello World” example, if appropriate. More complex tutorials should live in the Tutorials section.
Consider using the headings below for your getting started page. You can delete any that are not applicable to your project.
Prerequisites
Are there any system requirements for using your project? What languages are supported (if any)? Do users need to already have any software or tools installed?
Installation
Where can your user find your project code? How can they install it (binaries, installable package, build from source)? Are there multiple options/versions they can install and how should they choose the right one for them?
Setup
Is there any initial setup users need to do after installation to try your project?
Try it out!
Can your users test their installation, for example by running a command or deploying a Hello World example?
3 - How To
Advanced Galv tasks broken down into simple steps.
3.1 - Set up AWS S3 for Galv
Galv servers usually provide a limited amount of storage to each Lab. To store files exceeding this quota, you can set up an AWS S3 bucket for your Lab, and any Teams and Harvesters in your Lab will be able to store data there.
Create an AWS account
If you don’t already have an AWS account, you can create one at https://aws.amazon.com/
Create an S3 bucket
Once you’ve logged in to AWS, go to the S3 service and create a new bucket.
You can find the S3 service in the “Storage” section of the AWS Management Console,
or you can search for it in the search bar.
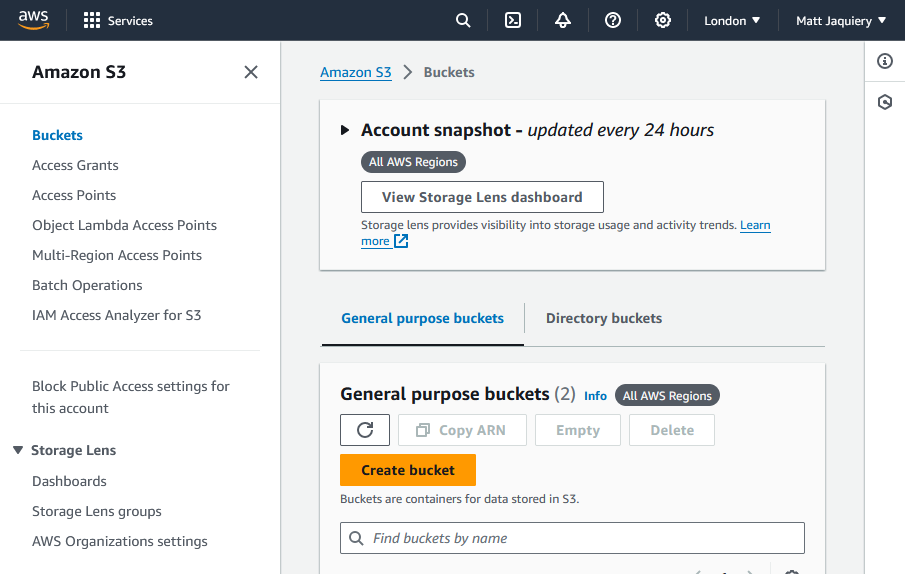
We won’t go into the details of creating a bucket here, but you can find more information
in the AWS documentation: https://docs.aws.amazon.com/AmazonS3/latest/userguide/creating-bucket.html
Once you’ve created the bucket, you’ll need to configure the CORS settings to allow Galv to access it.
You can do this by clicking on the bucket name in the S3 console, then going to the “Permissions” tab,
then going to the “Cross-origin resource sharing (CORS)” section.
[
  {
      "AllowedHeaders": [
          "*"
      ],
      "AllowedMethods": [
          "HEAD",
          "GET"
      ],
      "AllowedOrigins": [
          "https://galv-backend-dev.fly.dev",
          "https://galv-frontend.dev.fly.dev"
      ],
      "ExposeHeaders": [],
      "MaxAgeSeconds": 3600
  }
]
Set the “AllowedOrigins” to the URLs of your Galv frontend and backend servers.
If you’re setting things up in the frontend, the frontend URL is the URL of the site you’re on,
and the backend URL can be found by going to the ‘Harvesters’ tab and reading the text at the top.
Once you’ve created the bucket, copy its ARN because you’ll need it later.
On the main Buckets screen, select the bucket radio button and click ‘Copy ARN’.
Create an IAM user with access to the bucket
Next, you’ll need to create an IAM user with access to the S3 bucket.
You’ll want this user to have the minimum permissions necessary to access the bucket,
because the credentials will be stored in Galv and could be exposed if the server is compromised.
Galv will need to read and write files to the bucket, but it doesn’t need to be able to change bucket settings.
First, go to the IAM service in the AWS Management Console.
Then go to the Policies section under ‘Access management’ and create a new policy.
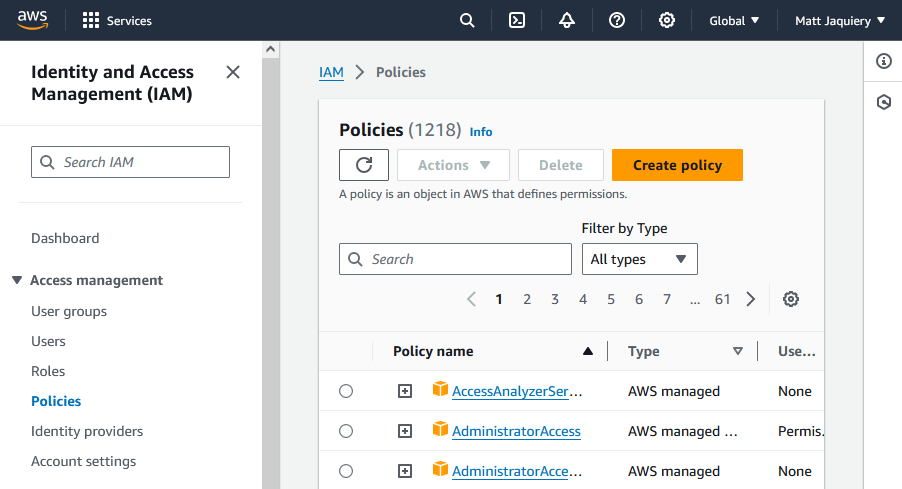
You can use the JSON editor to create a policy like this:
{
  "Version": "2012-10-17",
  "Statement": [
      {
          "Sid": "VisualEditor0",
          "Effect": "Allow",
          "Action": [
              "s3:ListBucketMultipartUploads",
              "s3:ListBucket",
              "s3:PutBucketCORS",
              "s3:GetBucketAcl",
              "s3:ListMultipartUploadParts",
              "s3:PutObject",
              "s3:GetObjectAcl",
              "s3:GetObject",
              "s3:GetObjectTorrent",
              "s3:GetBucketCORS",
              "s3:GetObjectVersionAcl",
              "s3:DeleteObject",
              "s3:GetObjectVersion"
          ],
          "Resource": [
              "arn:aws:s3:::my-galv-bucket/*",
              "arn:aws:s3:::my-galv-bucket"
          ]
      }
  ]
}
Make sure to replace the entries in ‘Resource’ with the ARN of your bucket, which you can find in the bucket properties.
Next, create a new user in the IAM service and attach the policy you just created to the user.
If you prefer to use Groups, you can create a Group and attach the policy to the Group instead,
then add the user to the Group.
Finally, create an access key for the user and save the Access Key ID and Secret Access Key.
Do that by selecting your user from the Users section and going to the ‘Security credentials’ tab.
Create an ‘Access key’ for a ‘Third-party service’ or ‘Application running outside AWS’.
Copy the Access Key ID and Secret Access Key because you’ll need to enter them in Galv.
Set up the AWS credentials in Galv
Finally, you’ll need to enter the AWS credentials in Galv so that it can access the S3 bucket.
Click on the ‘Additional storage’ icon in the navigation bar, then click ‘Create new additional storage’.
You can fill out the form using the Access Key ID and Secret Access Key you created in the previous step,
and you’ll also need the bucket name and the AWS region the bucket is in.
The ’location’ field allows you to specify a path within your bucket where files will be stored.
Fill out the information, make sure the storage is set to ’enabled’,
and click the green floppy disc icon to create your storage.
You should now be able to upload files to your S3 bucket from Galv,
and Galv will take care of making sure that the appropriate people can access them.
4 - Tutorials
Learn to use Galv with an easy-to-follow tutorial. We even provide the data.
4.1 - Getting started
This guide will help you get set up to use Galv. You’ll create an account, set up a Lab and a Team, and configure a Harvester to start collecting data. Once you’ve done that, you’ll use Galv to add metadata and create datasets you can export.
Creating an account
Go to the Galv Frontend and create an account.
You do this using the ‘sign up’ button in the top right corner of the page.
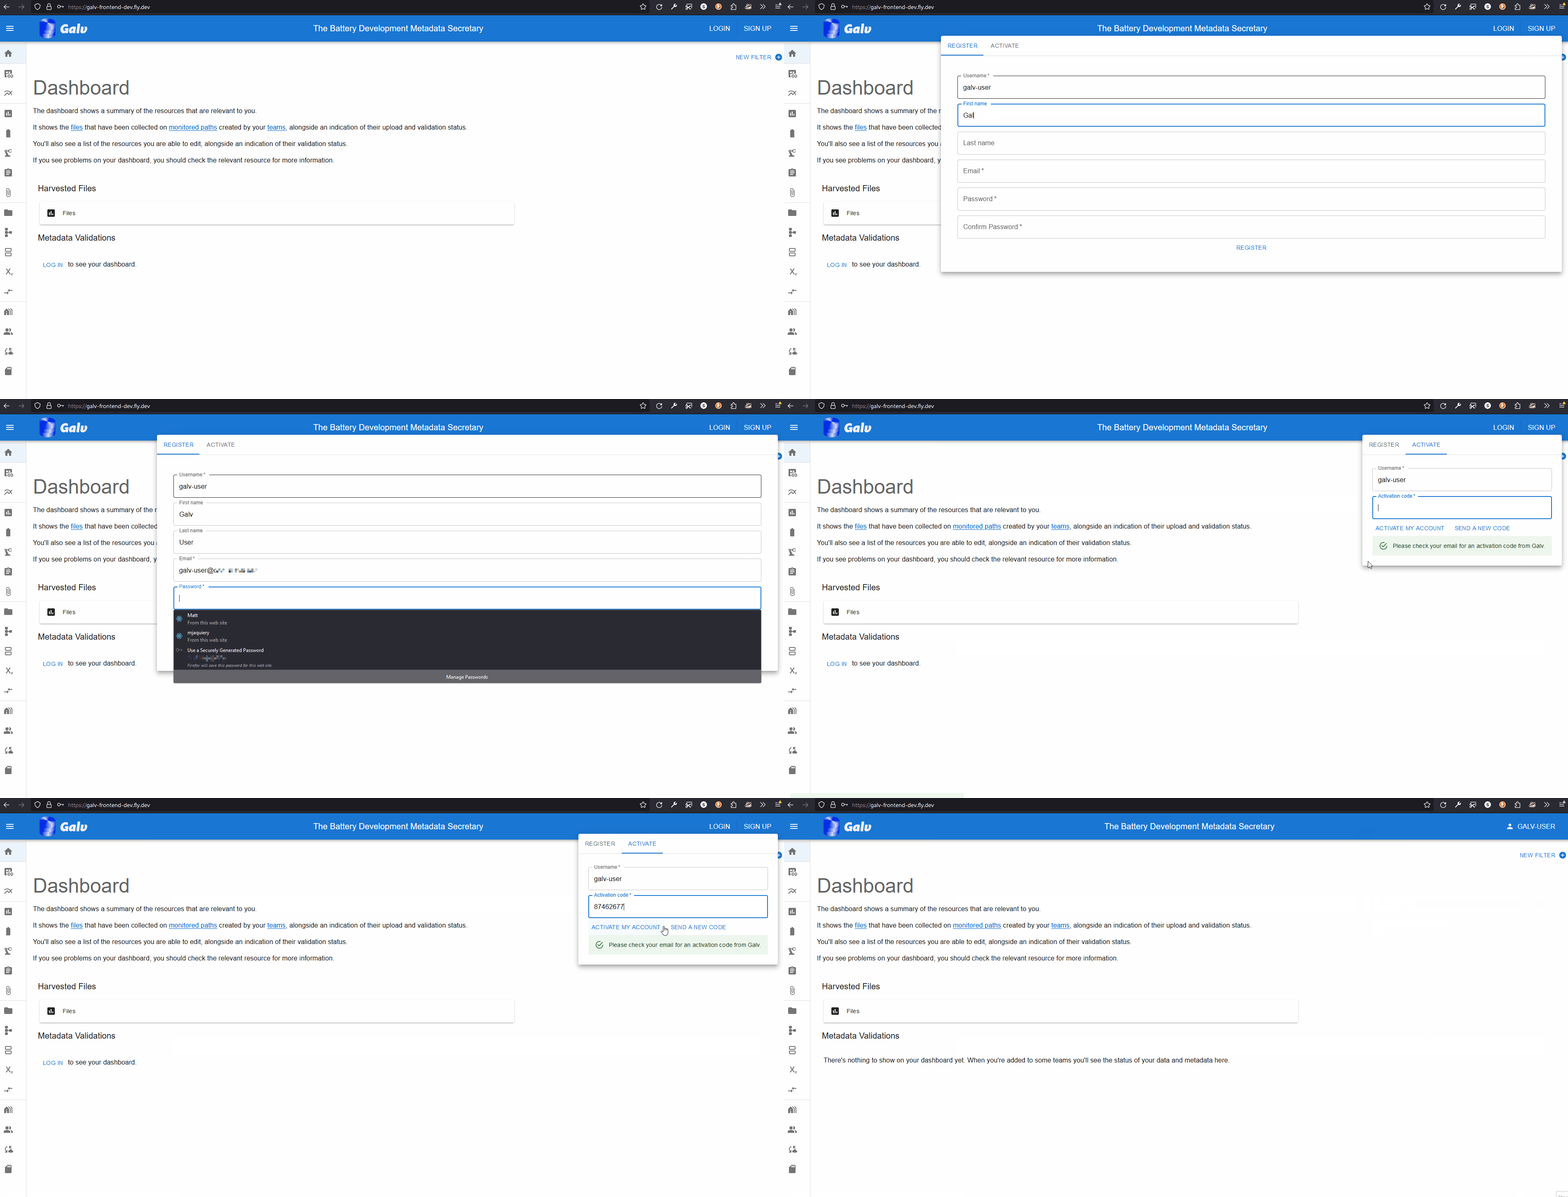
Fill in your details and click ‘Sign up’.
You’ll be sent an email with a code to verify your account.
Enter the code on the verification page to complete the process.
Creating a Lab
The first thing we need as a user is a Lab.
Normally, you’ll join someone else’s Lab, but for now, we’ll create our own.
Click on the ‘Labs’ tab in the navigation bar on the left.
You can expand the bar to see the icon names by clicking the hamburger icon in the top left corner of the page.
On the Labs page you’ll see a description of what a Lab is.
If you belonged to a Lab, you’d see it listed here.
Click the ‘Create Lab’ button to create a new Lab.
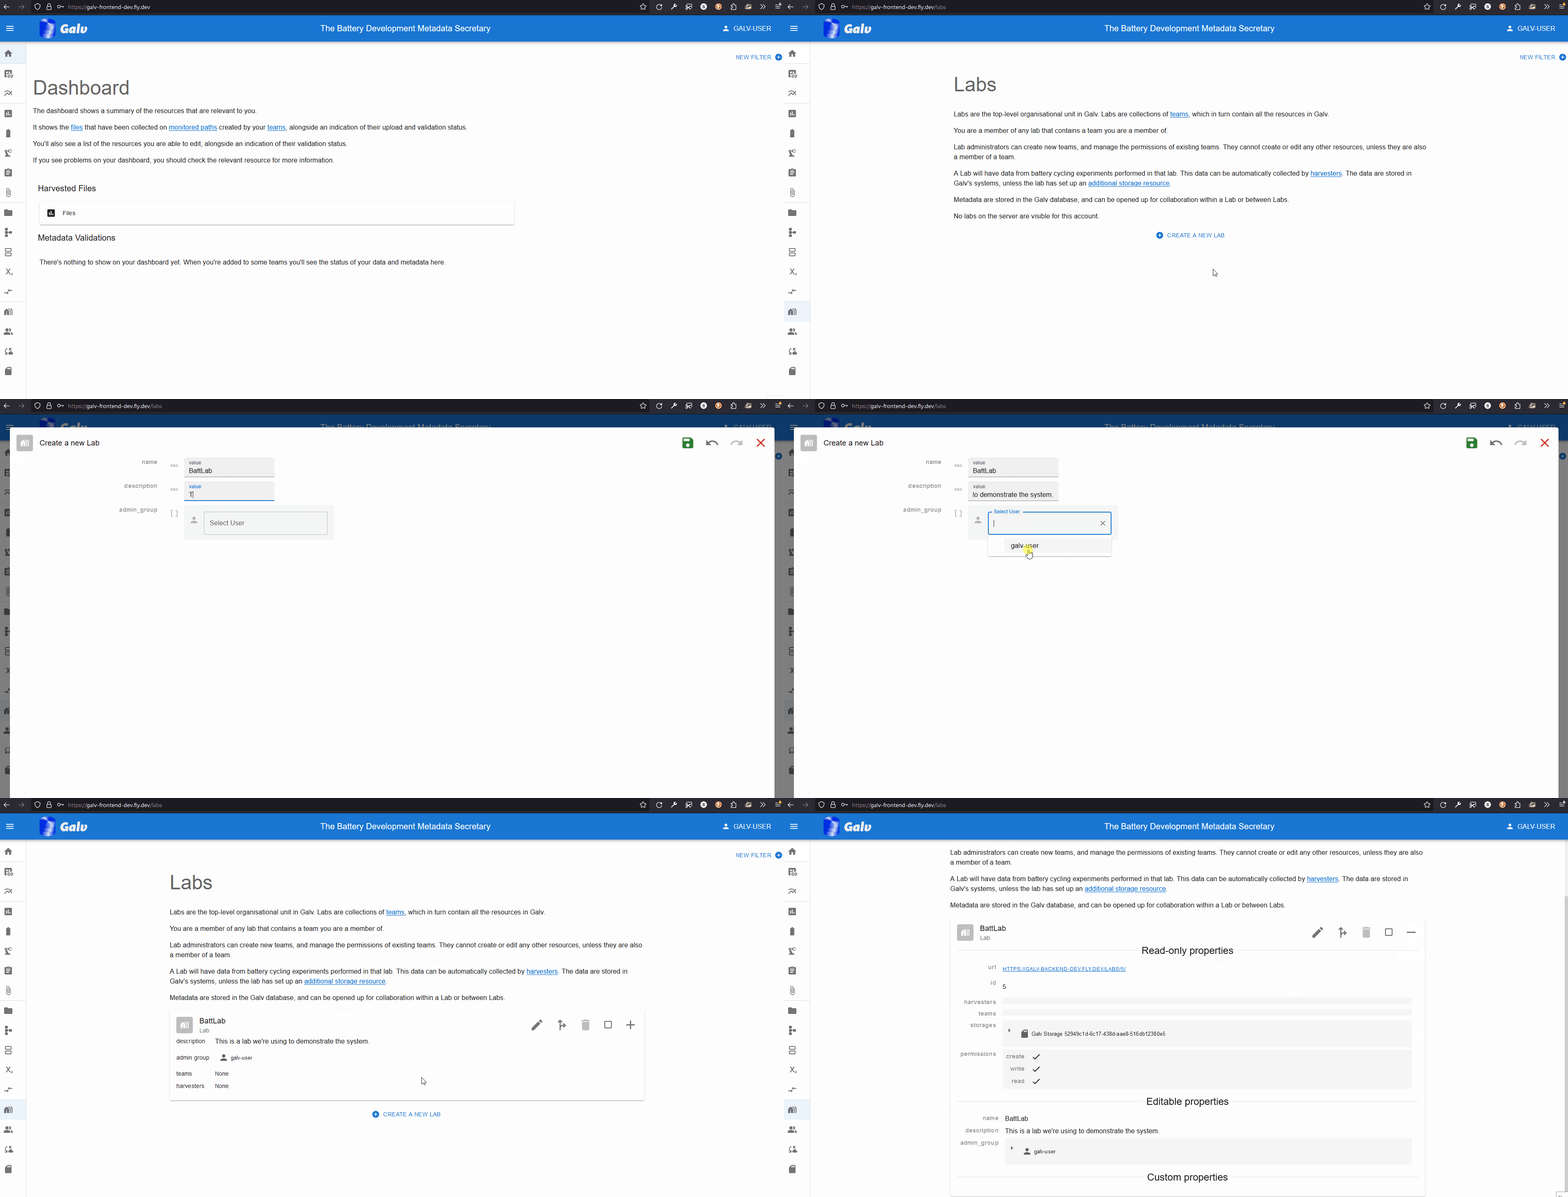
A Lab needs a name, so enter one in the ‘Name’ field.
You can also add a description if you like.
A Lab also needs an Administrator.
You’re the first user in this Lab, so you’ll be the Administrator.
Select your username from the dropdown list.
Click the green floppy disc ‘save’ icon to create the Lab.
You will now see your Lab listed on the Labs page.
You can click the ‘+’ icon to expand the Lab and see more details.
Creating a Team
Now that we have a Lab, we can create a Team.
A Team is a group of users who work together on a project.
Click on the ‘Teams’ tab in the navigation bar on the left.
You’ll see a description of what a Team is.
If you belonged to a Team, you’d see it listed here.
Click the ‘Create Team’ button to create a new Team.
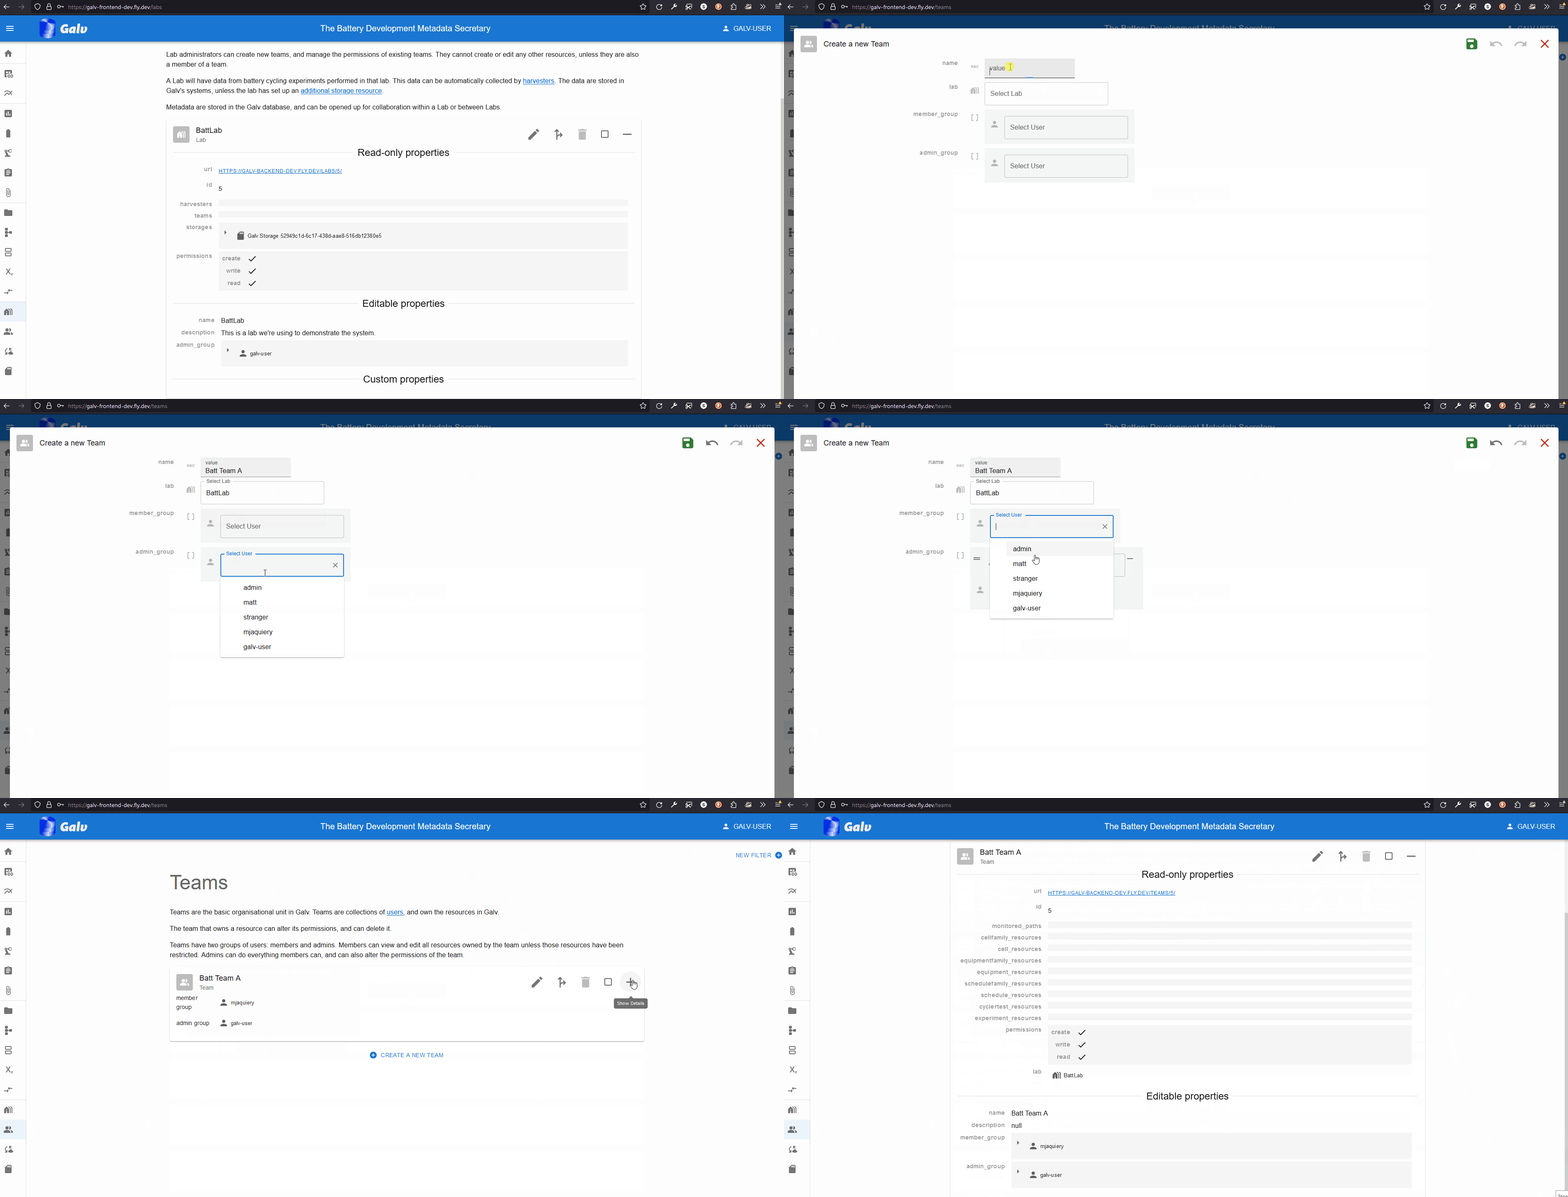
Enter the name of your Team in the ‘Name’ field.
Select your Lab from the dropdown list.
We can add users as Team members or Team admins.
For now, we’ll just add ourselves as a Team admin.
Select your username from the dropdown list in the ‘Team Admins’ field.
Click the green floppy disc ‘save’ icon to create the Team,
and you’ll see your Team listed on the Teams page.
Uploading a dataset
Now that we have a Lab and a Team, we can upload some data.
Uploading a known file type
We’ll start by uploading a file that Galv knows how to handle.
Download the BioLogic .mpr file from the link below:
https://github.com/jepegit/cellpy/raw/refs/heads/master/testdata/data/biol.mpr
Next, go to Galv and click the ‘Upload a New File’ button in either the Dashboard or the Files page.
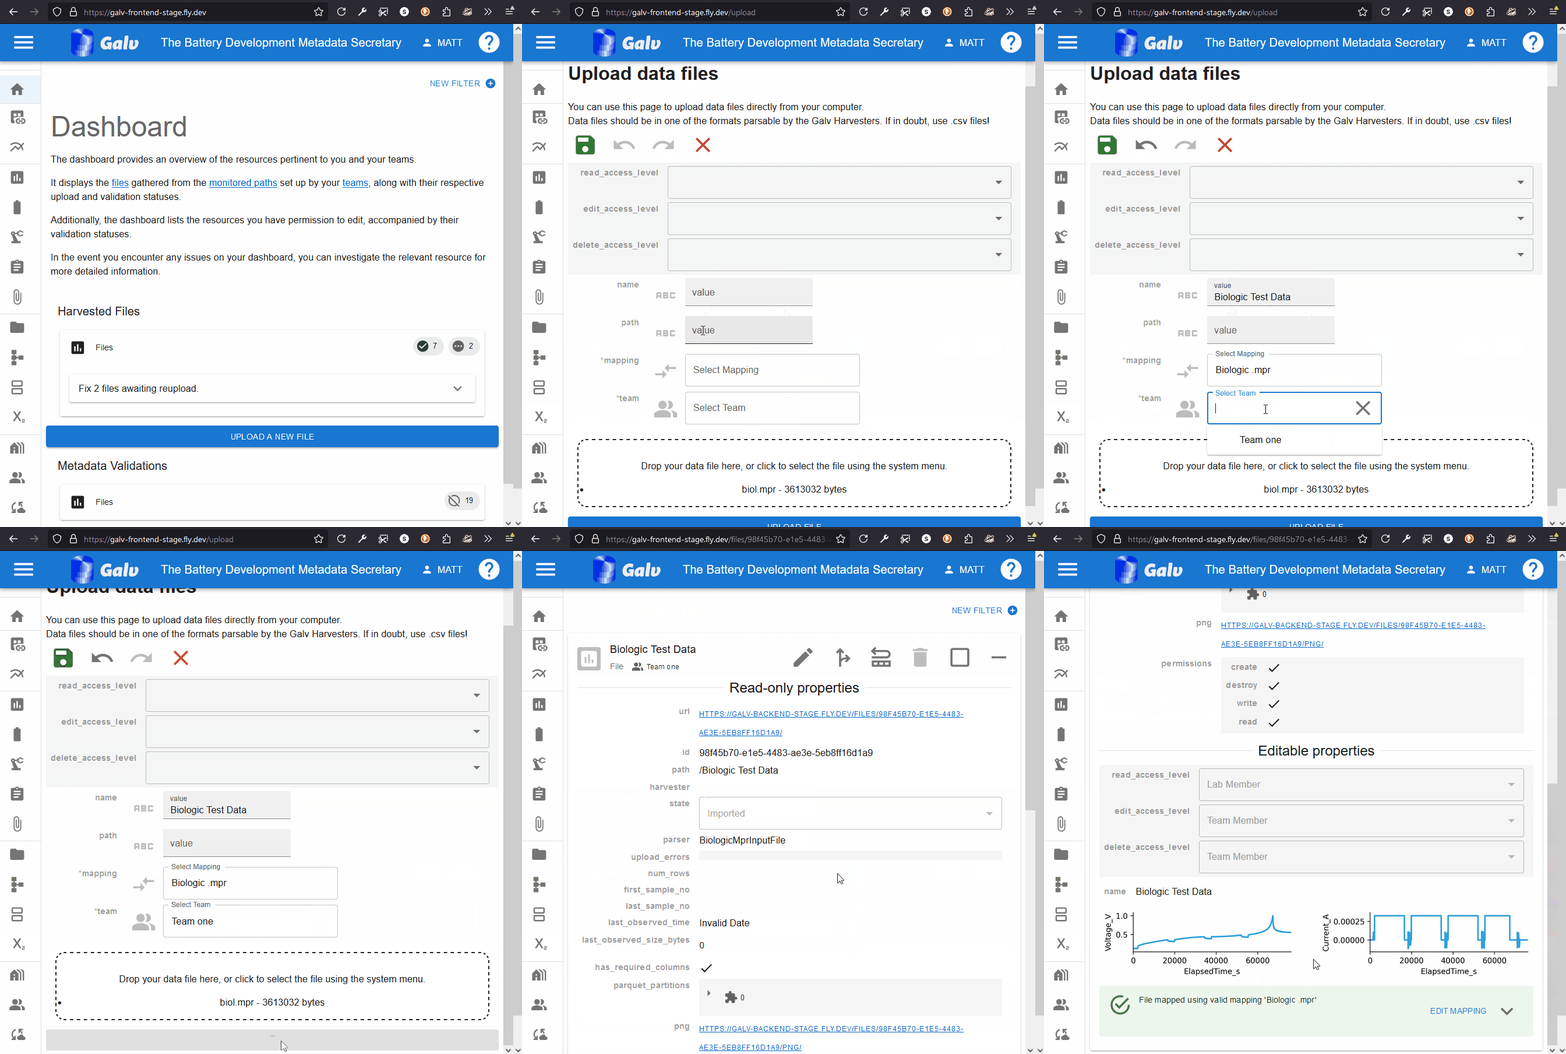
Drop the file you downloaded into the upload area, or click the ‘Choose a file’ button to select it from your computer.
Make sure you select the ‘BioLogic .mpr’ from the ‘mapping’ dropdown list.
Assign the file to your Team, and (optionally) add a custom name for the file.
Then click ‘Upload File’ to start the upload process.
Once the file is uploaded, you will be taken to its page.
You can see the metadata that Galv has extracted from the file,
and you can add any custom properties you need.
At the bottom you’ll see a graph of the data in the file.
Uploading an unknown file type
You may not know the file type of the data you’re uploading.
That’s okay - Galv can still handle it.
Let’s pretend we don’t know the file type of the data we’re uploading.
Go to the Files page and click the ‘Upload a New File’ button.
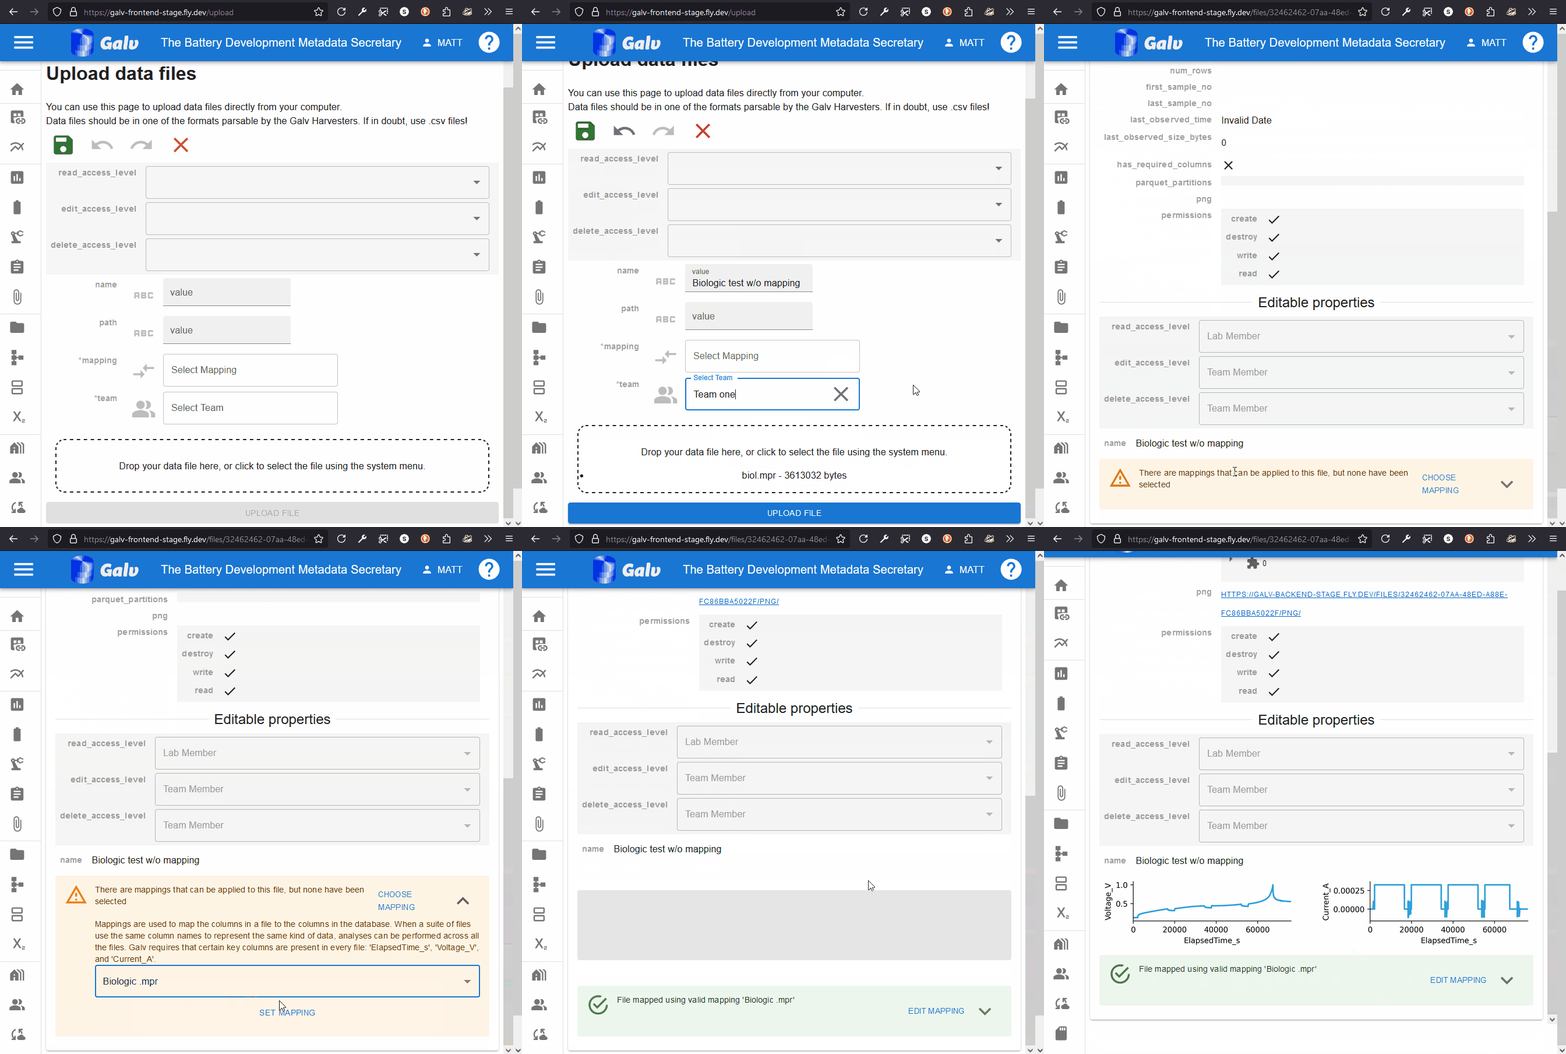
Drop the .mpr file you downloaded in the previous step into the upload area,
or click the ‘Choose a file’ button to select it from your computer.
Leave the ‘mapping’ dropdown list blank.
Select your team and (optionally) add a custom name for the file.
Then click ‘Upload File’ to start the upload process.
Once the file is uploaded, you will be taken to its page.
Notice that Galv says the file is unmapped, and that you don’t see any parquet partitions (data)
or a preview image.
At the bottom of the page, you’ll see Galv is warning you that the file is unmapped.
Use the dropdown within that warning area to select the correct mapping for the file.
Notice that whereas in the previous example you had lots of mappings to choose from,
now you only have two.
That’s because Galv has detected that only two mappings are compatible with the data in the file.
Select the correct mapping (Biologic .mpr) and click ‘Map File’.
You’ll see that the mapping has now been applied, and Galv is asking you to reupload the file.
This is because the file needs to be reprocessed with the new mapping.
Drop the file into the upload area again, or click the ‘Choose a file’ button to select it from your computer.
Click ‘Upload File’ to finish the upload process.
Once the file is uploaded, you’ll see the data and the preview image appear on the File’s page, just like before.
You’ll also see that Galv is now telling us that the file is correctly mapped.
Viewing your data
When Galv imports data from a file, it applies some light processing to it so that it is compatible with other
Galv files.
It also saves the data in .parquet <https://parquet.apache.org/>_ format,
which is a columnar storage format that is efficient for querying.
Parquet files are broken into partitions, which each contain a subset of the data (e.g. 100,000 rows).
You can see the partitions for a File by expanding its card and looking for ‘parquet_partitions’.
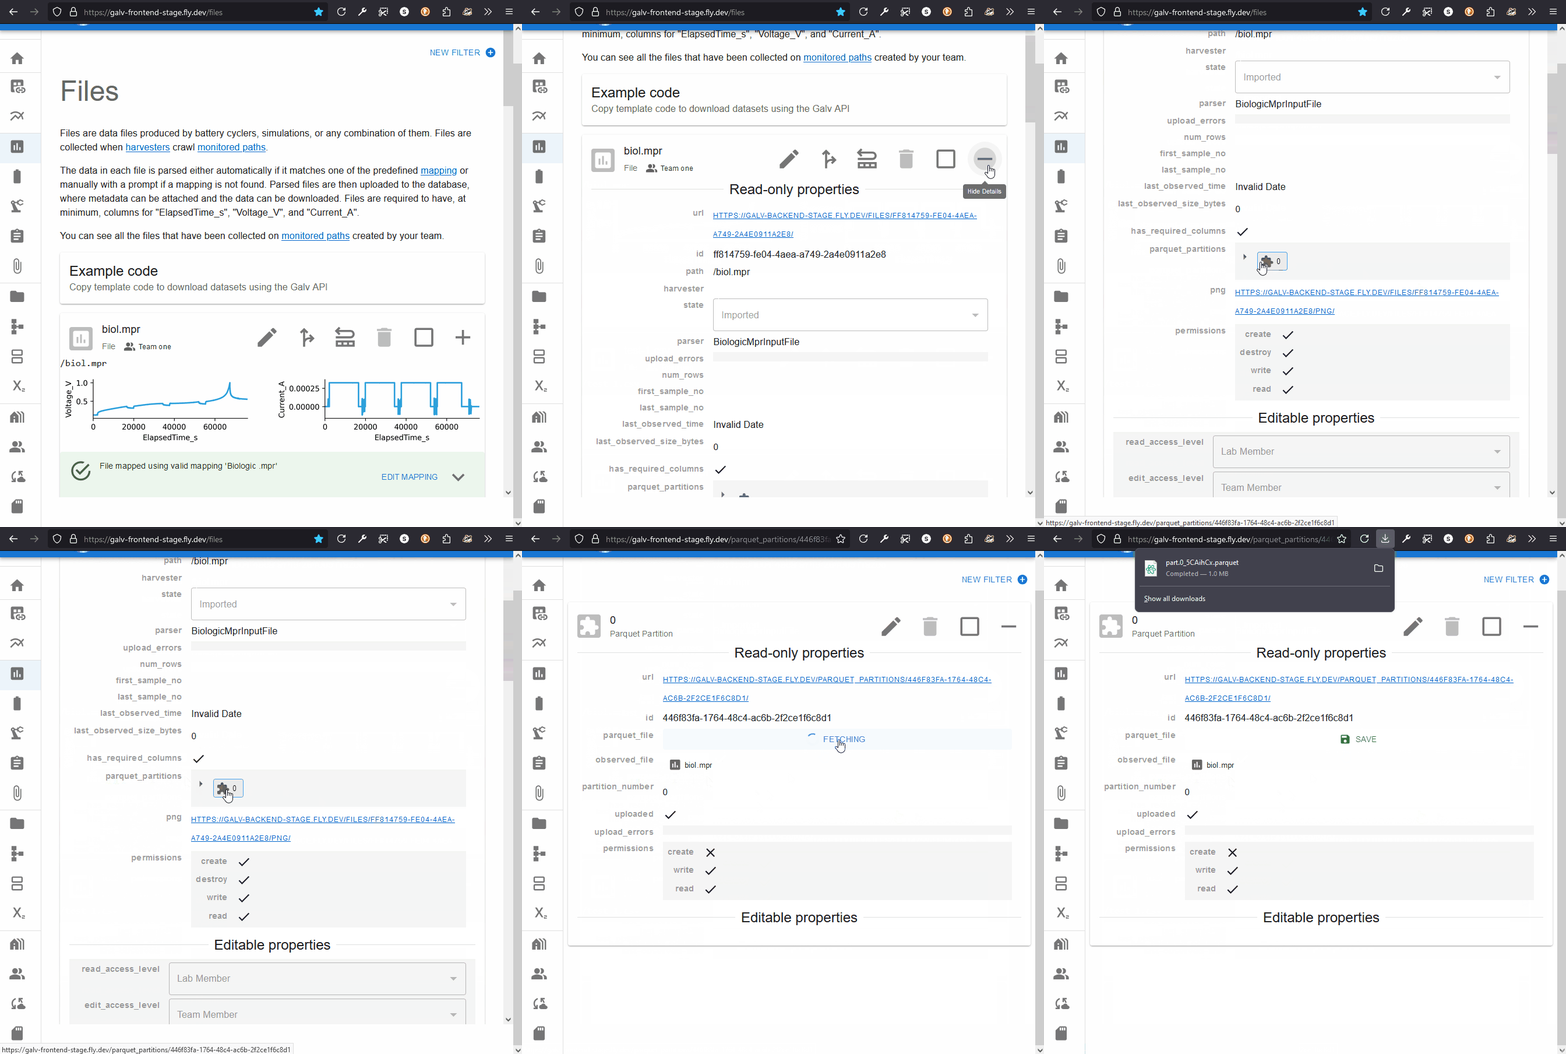
Clicking the partition will take you to the page for the Partition.
This page will have a download button under ‘parquet_file’.
Clicking this button will download prepare the file for download,
and, when it’s ready, you’ll be able to save it to your computer.
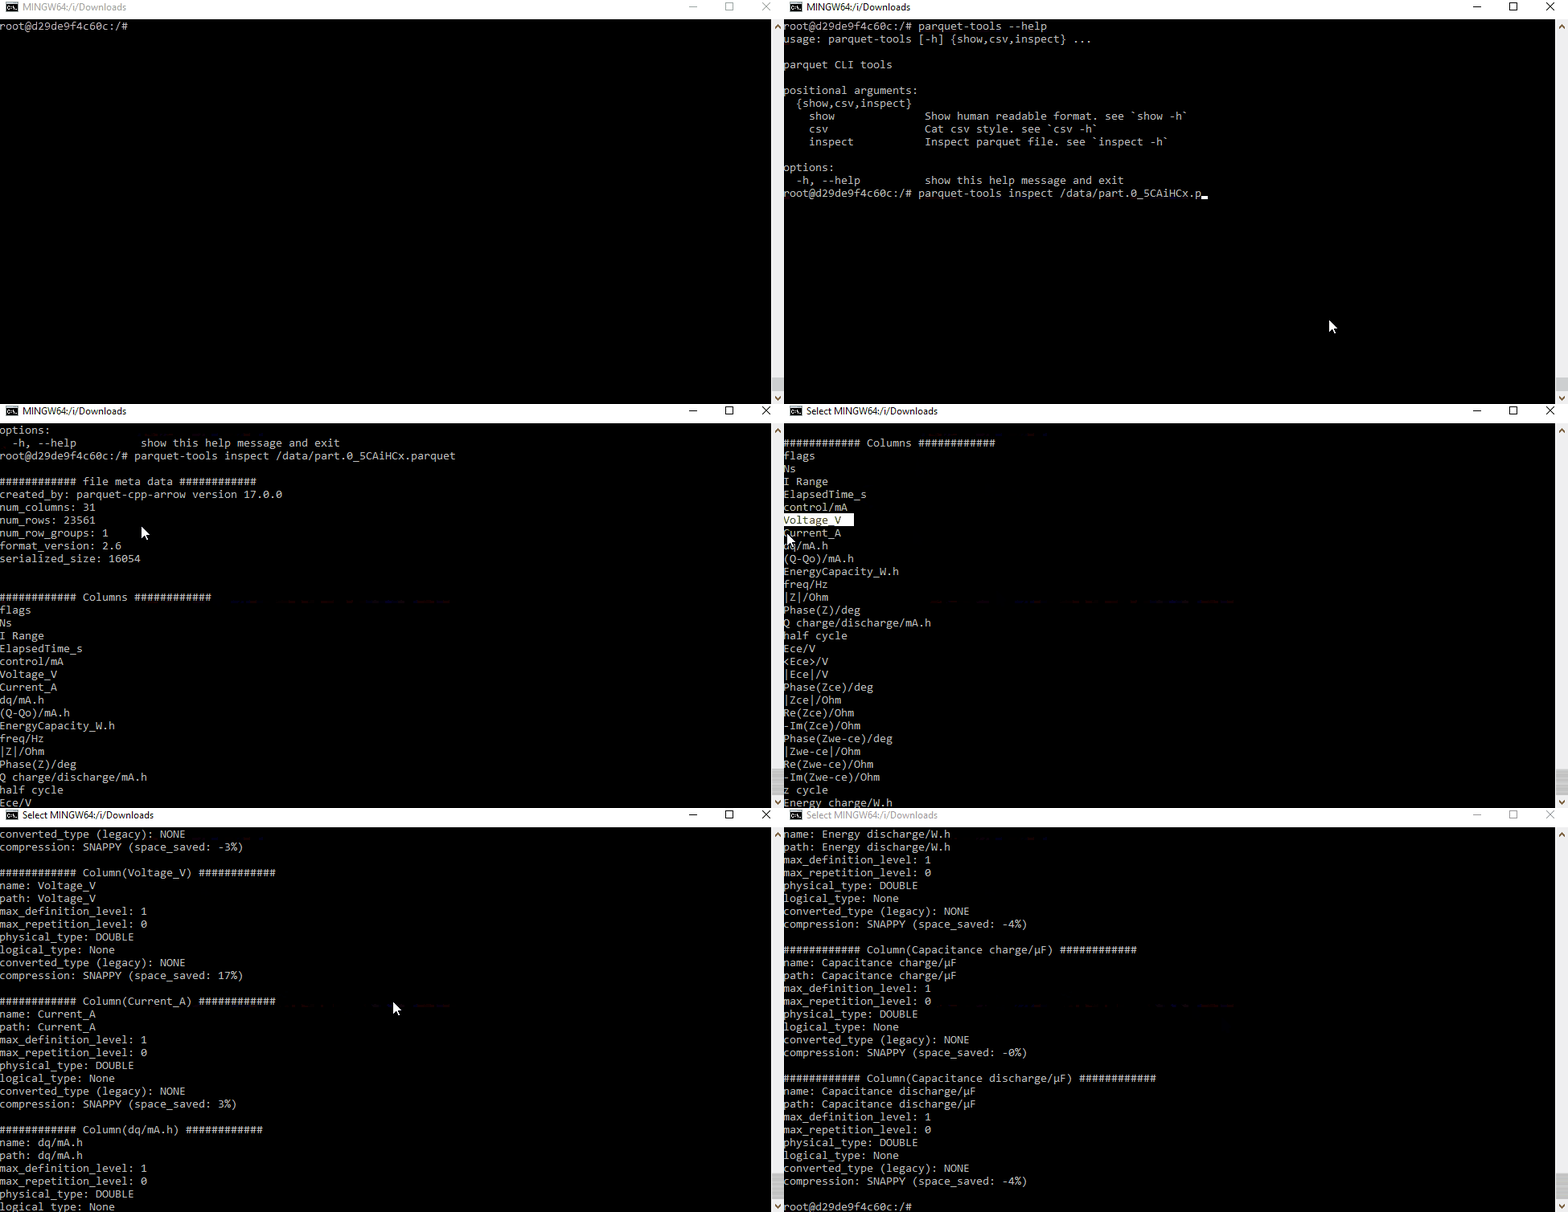
You can view the contents of a parquet file using a tool like
ParquetViewer <https://github.com/mukunku/ParquetViewer>_ on Windows,
or by using the parquet-tools <https://pypi.org/project/parquet-tools/>_ Python package.
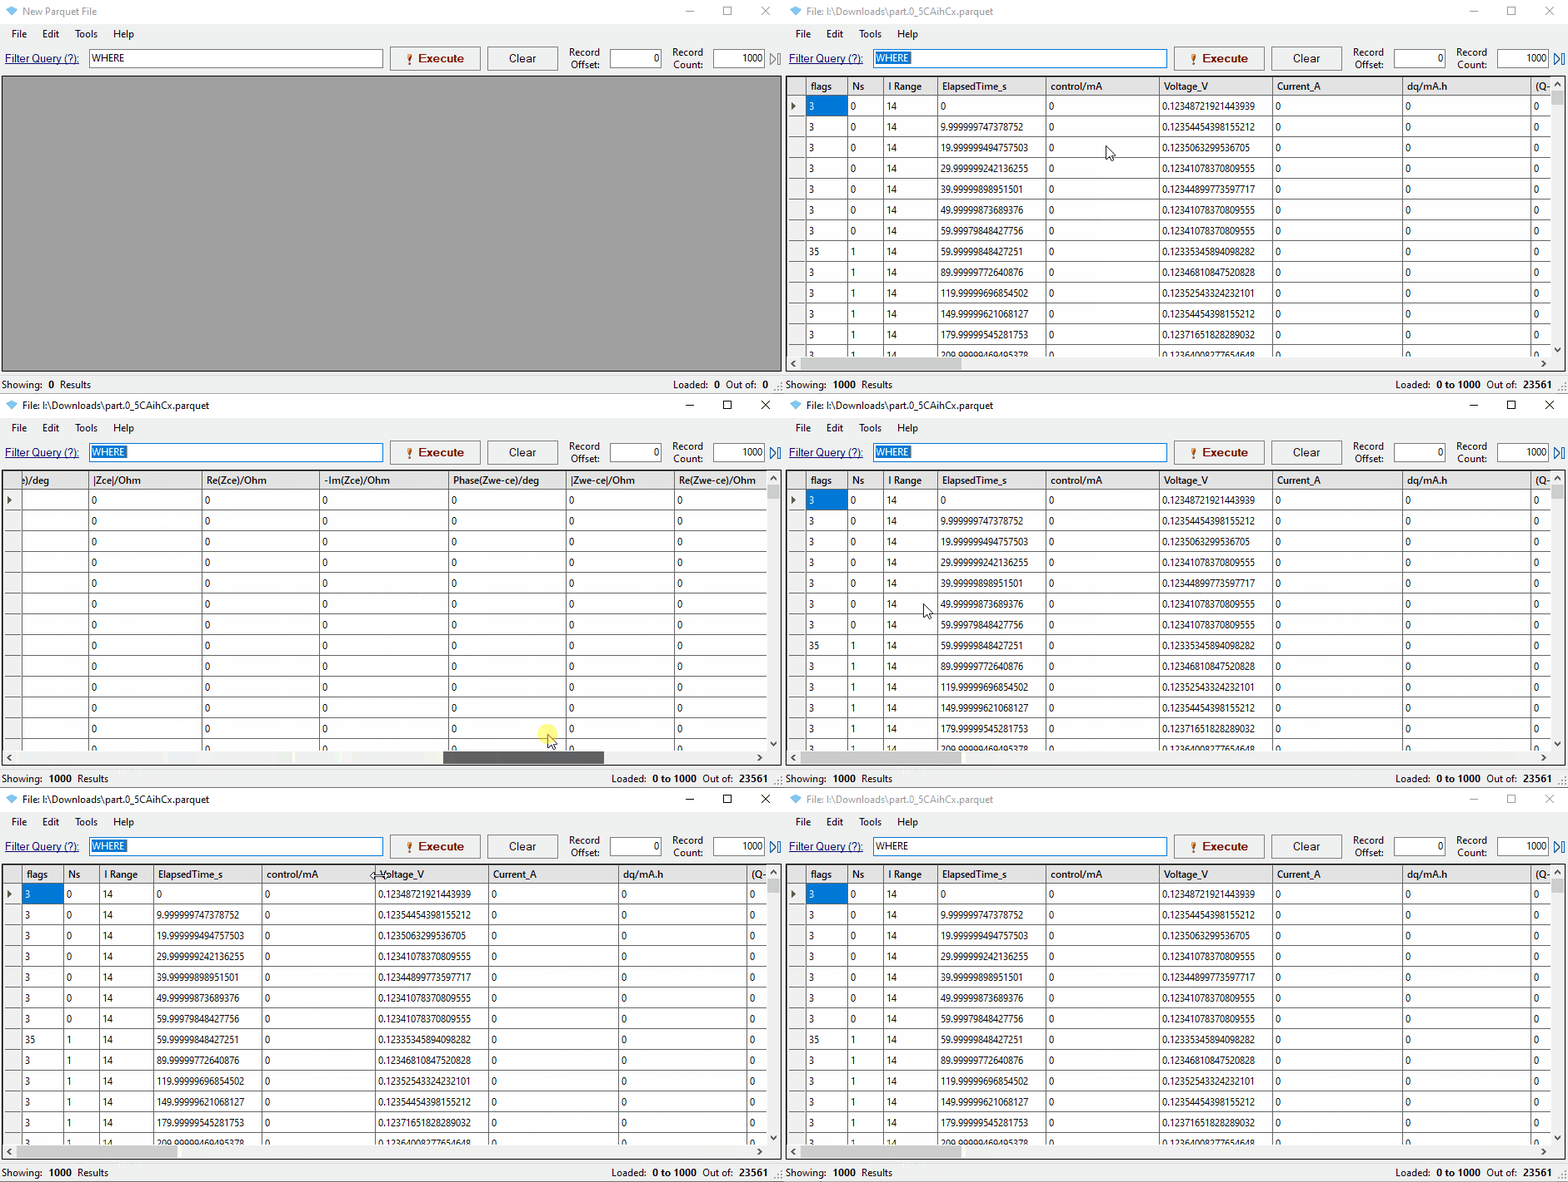
Notice that the mapping has renamed three key columns in the data:
- ElapsedTime_S
- Voltage_V
- Current_A
Next steps
Now you’ve learned how to upload data, upload some data files of your own.
Once you’ve done that, you can learn about how to Manage Resources
so that you can tie information about Cells and other resources to your data.
4.2 - Managing Resources
Resources in Galv are things that hold metadata about datasets. They refer to things in the real world that are associated with the data.
Learn how to add metadata to describe experiment.
We’ll describe the Cell, the battery cycler, and the Schedule that the data came from.
Then we’ll package it into a Cycler Test to group the data and metadata together,
and finally we’ll add the Cycler Test to an Experiment to show how it fits into the bigger picture.
Adding a Cell
Click on the ‘Cells’ tab in the navigation bar on the left.
Cells, like Equipment and Schedules, belong to ‘families’.
Families are a way of grouping similar resources together.
You will have done your experiments on a particular physical cell,
but that cell will probably have many others that are similar to it.
Let’s start by creating the family that our cell belongs to.
Click the ‘Create a new Cell Family’ button to create a new family.
You’ll have several fields to fill in.
You can hover over a field to get more information about it,
and you can see at a glance that any field with * before it is mandatory.
If there is information that you want to associate with the family that isn’t covered by the fields,
you’ll be able to add it later as a ‘custom property’.
Once you’ve filled in the fields, click the green floppy disc ‘save’ icon to create the family.
Now that we have a family, we can create a Cell.
Click the ‘Create Cell’ button to create a new Cell.
Because we supplied most of the information about the cell when we created the family,
all we need to do here is select that family, put in the cell identifier (usually a serial number),
and associate the Cell with our Team.
Once you’ve filled in the fields, click the green floppy disc ‘save’ icon to create the Cell.
Custom Properties
Custom properties are a way of adding extra information to a resource.
Click on the pencil icon to edit the Cell you just created.
You’ll see all the information you entered when you created the Cell,
as well as all the properties that are inherited from the family.
You can change the identifier or family if you need to under ‘Editable properties’,
and you can add custom properties under ‘Custom properties’.
Enter a name for the custom property in the ‘+Key’ field.
You’ll see a dropdown list of types you can use for the value.
By default it’s set to ‘string’, but you can change it to a different type if you need to.
All the resource types are included, too, so you can have custom properties that are references to other resources.
Once you’ve selected your type, enter an appropriate value in the ‘value’ field,
and click the green floppy disc ‘save’ icon to add the custom property.
Adding Equipment and Schedules
You can add Equipment and Schedule resources in the same way you added the Cell.
Click on the ‘Equipment’ or ‘Schedules’ tab in the navigation bar on the left,
create a family, and then create the resource.
Creating a Cycler Test
A Cycler Test is a way of grouping data and metadata together.
It’s a way of saying ’this data came from this experiment’.
Click on the ‘Cycler Tests’ tab in the navigation bar on the left.
Click on ‘Create Cycler Test’ to create a new Cycler Test.
Select your Cell, Equipment, and Schedule from the dropdown lists.
You can also add a File that holds the data from your test if it’s been harvested.
Associate the resource with your team, and then click the green floppy disc ‘save’ icon to create the Cycler Test.
Creating an Experiment
An Experiment is a way of grouping Cycler Tests together.
It’s a way of saying ’these tests were all part of the same project’.
By now the interface should be familiar to you.
You can associate yourself and other users with the Experiment by adding them as Authors.
You can select any number of Cycler Tests to associate with the Experiment.
Once you’ve created the Experiment, you can add any custom properties you need.
Next steps
Now you can upload data and create resources to describe it.
You’re ready to start using Galv to manage your data and metadata.
If you would like to learn about how to automatically collect data from your battery cycler,
check out the Configuring Harvesters tutorial.
4.3 - Configuring a Harvester
This guide will help you configure a Harvester to start collecting data automatically.
Before you begin this tutorial, you’ll need to have an account on Galv and be a Lab Administrator.
You should also have a Team set up in your Lab, and be a member of that Team.
To learn how to get to this point, see the Getting Started guide, and follow through the steps:
Creating a Harvester
A Harvester is a tool that collects data from a source and stores it in Galv.
Within Galv, click on the ‘Harvesters’ tab in the navigation bar on the left.
You’ll see a description of what a Harvester is.
If you had any Harvesters, you’d see them listed here.
Harvesters can only be created by a Lab Administrator.
Any Team in the Lab can use a Harvester once it’s created.
There’s no ‘Create Harvester’ button on the Harvesters page.
This is because Harvesters are created by running a Python script on the machine where the data is stored.
When we create the Harvester, we’ll need to know the URL of the Galv API, and we’ll need an API Token to authorise the creation of the Harvester.
The URL of the Galv API is shown in the text at the top of the Harvesters page.

Getting the API Token
You access your API Tokens through your user profile.
Click on your username in the top right corner of the page to open the user menu.
Click on ‘Tokens’ to see your API Tokens.
Click the ‘Create Token’ button to create a new API Token.
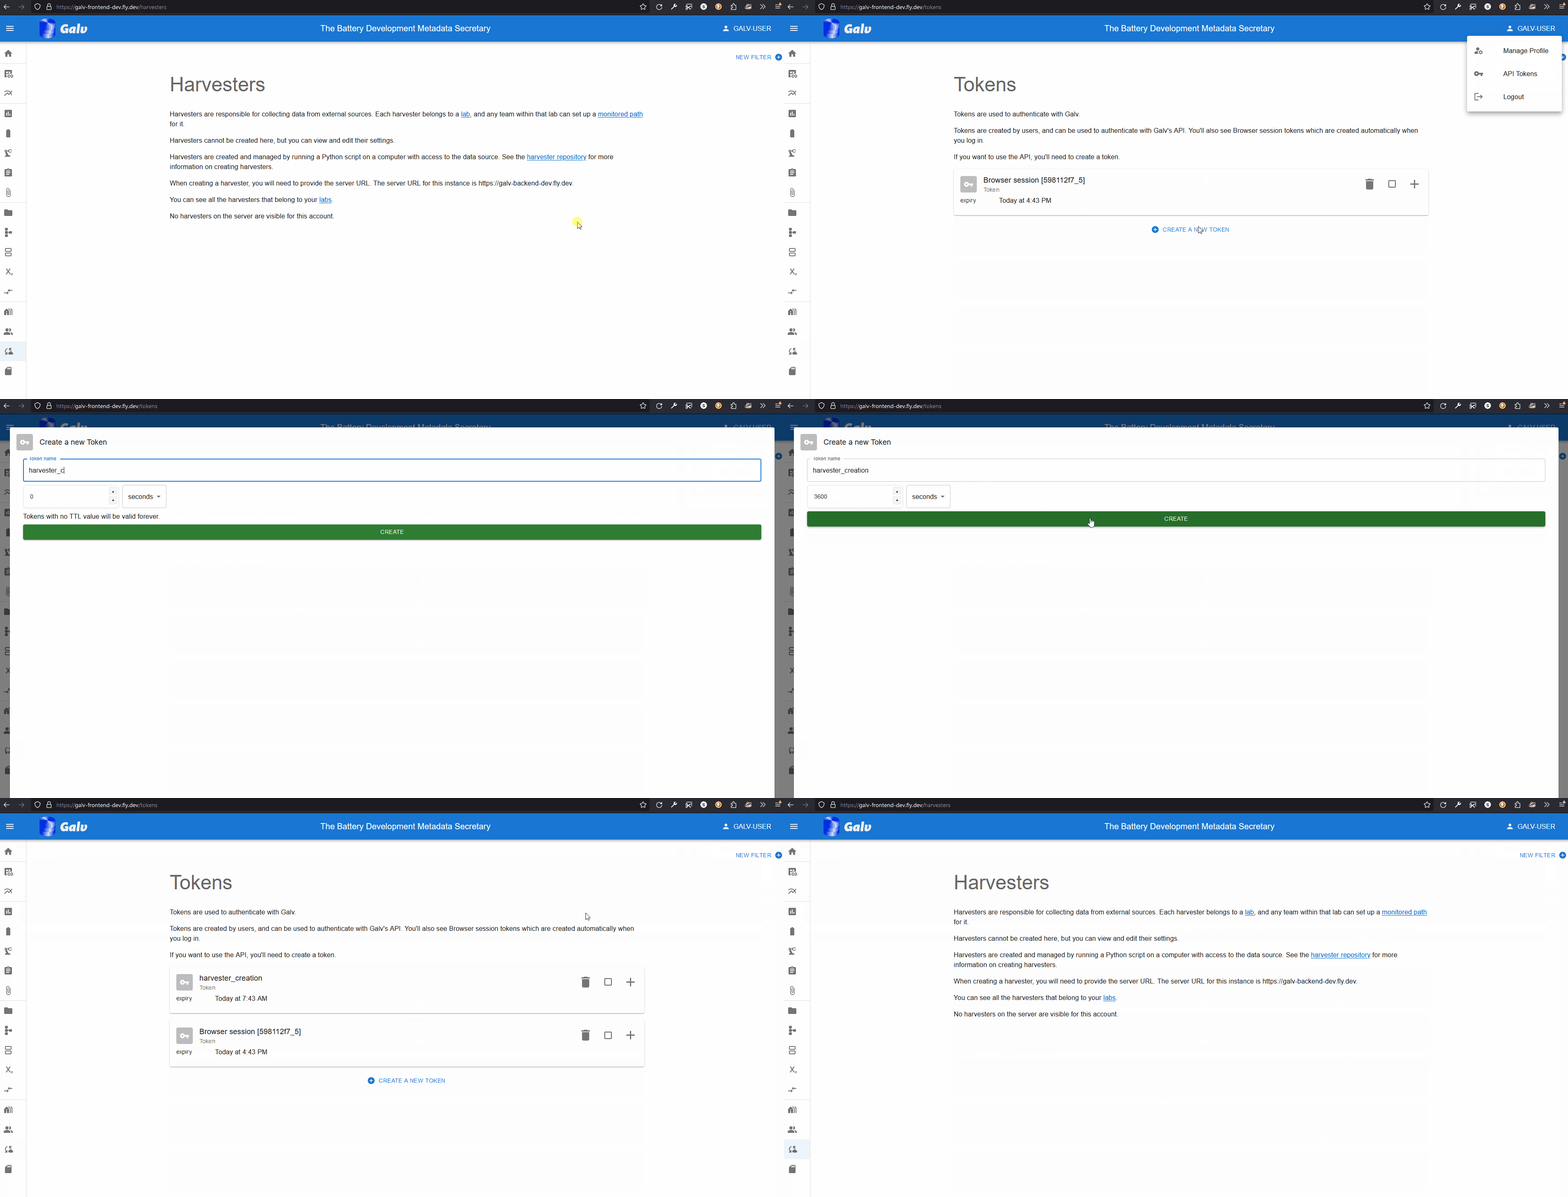
Give your Token a name, set its expiry for 3600s (1 hour), and click ‘Create’.
You’ll get a once-only chance to copy the Token to your clipboard.
Do that now.
Creating the Harvester
Go to the machine where the data is stored and open a terminal.
Run pip install galv-harvester to install the Galv Harvester Python package.
Installing the package gives you the galv-harvester command.
Run galv-harvester --help to see the options.
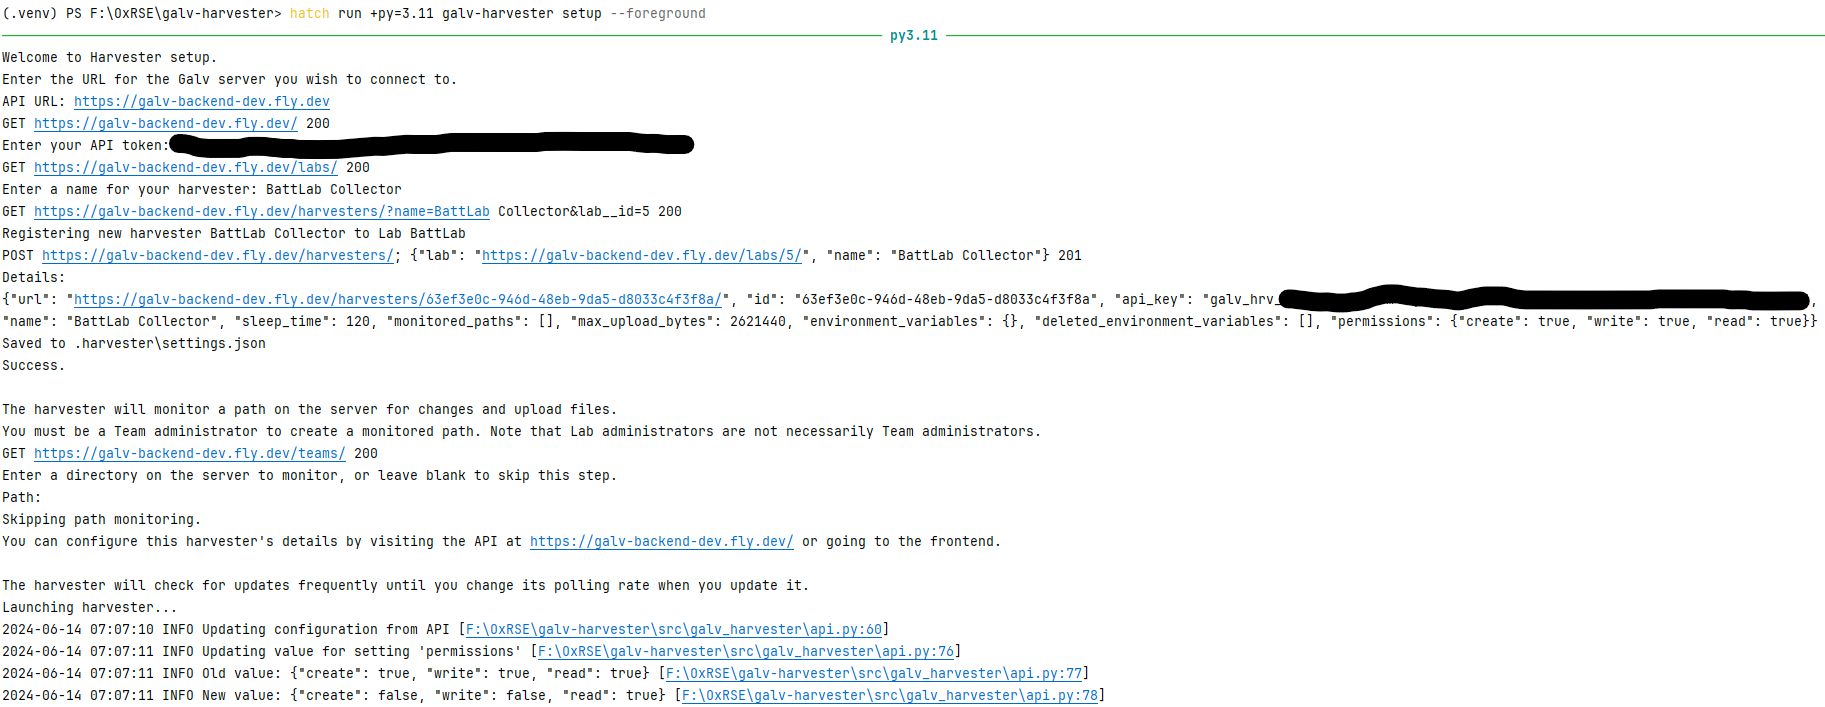
We want to set up a Harvester, so run galv-harvester setup.
You’ll be prompted for the URL of the Galv API and your API Token.
Enter the URL of the Galv API and your API Token when prompted.
You’ll be asked for the name of the Harvester.
Enter a name for the Harvester and press Enter.
That is enough to create the Harvester.
You’ll be prompted to create a Path for the Harvester to find data, but we’ll do that using the Frontend, so press Enter to skip that step.
You can see what the setup process looks like in the image below.
Once the Harvester is created, you can close the terminal and it will continue running in the background.
Go back to the Frontend and refresh the Harvesters page.
You’ll see your Harvester listed there.
The Harvester in action
The Harvester is now running and collecting data.
For the Harvester to work, you need to create a Path for it to find data.
Click on the ‘Paths’ tab in the navigation bar on the left.
You’ll see a description of what a Path is.
If you had any Paths, you’d see them listed here.
Click the ‘Create Path’ button to create a new Path.
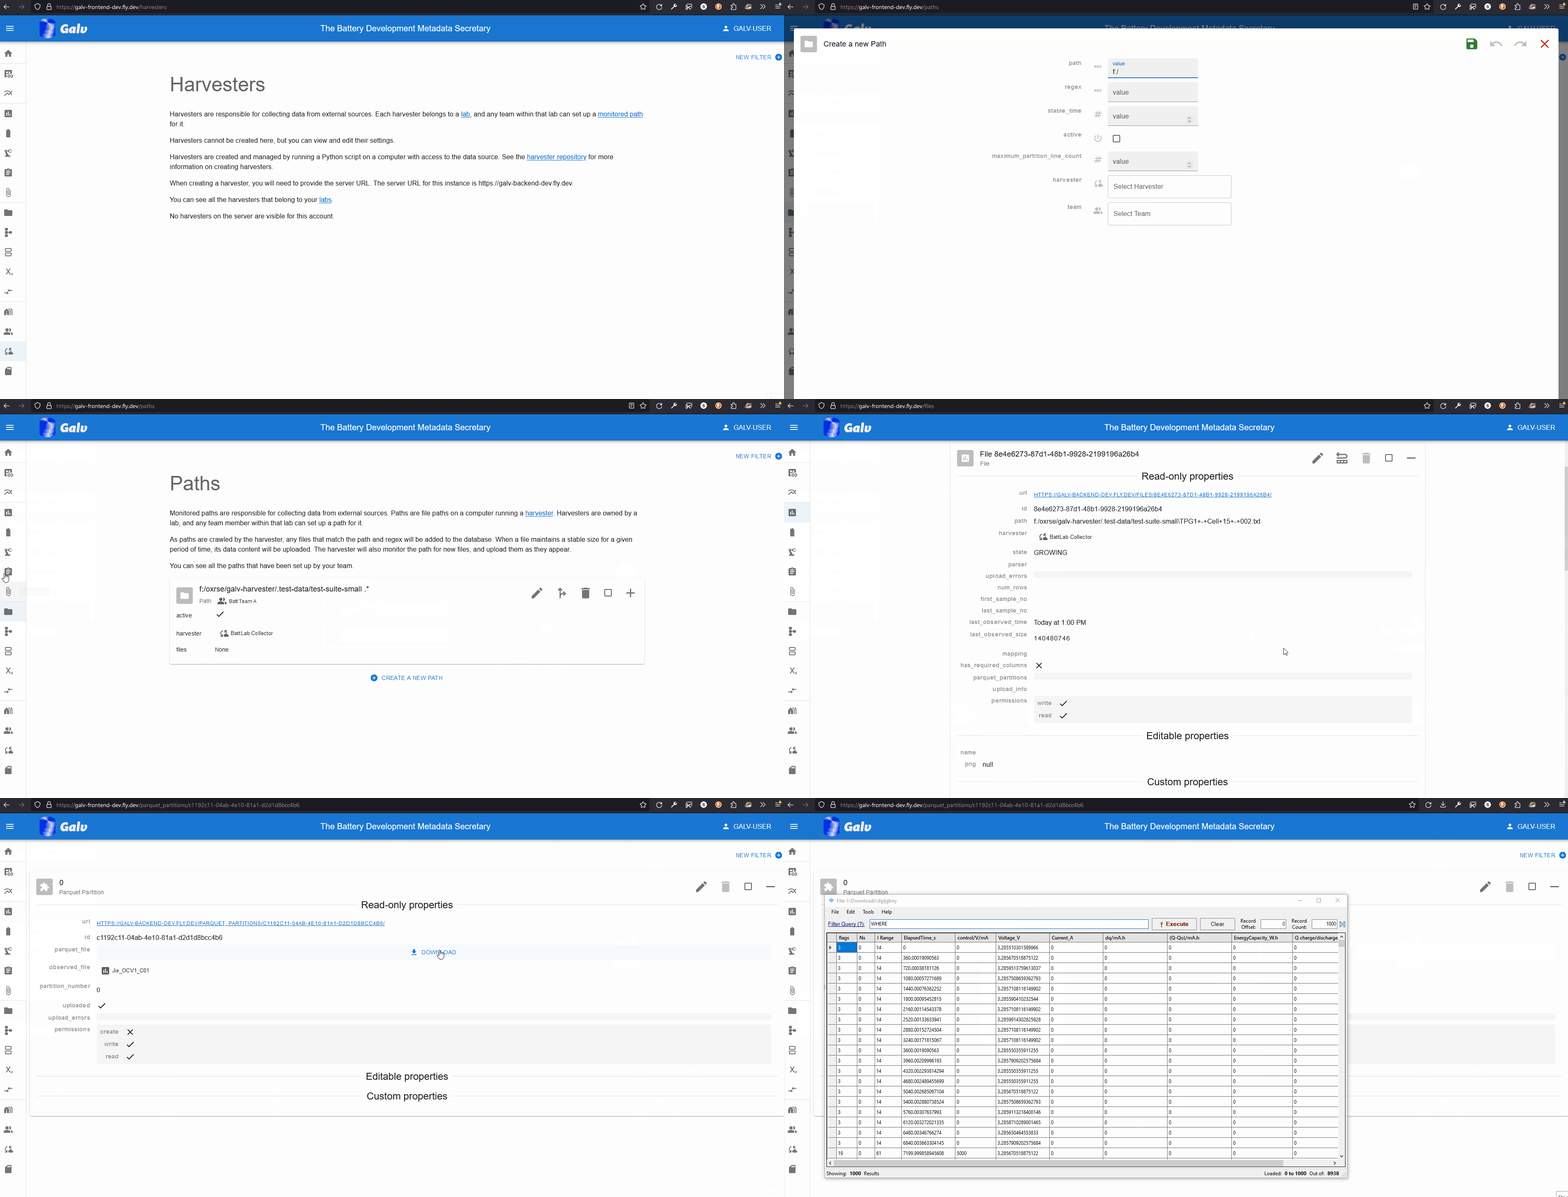
We’ll need to enter the following information:
- The absolute path to the directory where the data is stored.
- A regular expression to match the files we want to collect.
I used
.* to match all files. - The time a file must be unchanged before it’s collected.
This is useful for files that are being written to.
- Whether the Path is active.
If it’s not active, the Harvester won’t collect data from it.
- How many lines of data should be stored in each dataset partition.
This is useful for large files.
- The Harvester that will collect data from this Path.
- The Team that will own the data collected from this Path.
Once you’ve entered the information, click the green floppy disc ‘save’ icon to create the Path.
The Harvester will now collect data from the Path you created.
Let’s wait a few minutes for the Harvester to collect some data, then go to the Files page to see what it’s collected.
Viewing the collected data
You’ll see the data files that have been Harvested listed on the Files page.
Initially, all the files will be marked as ‘GROWING’.
Once the Harvester has seen that they are stable, they will be imported.
You can see the status of the files change from ‘GROWING’ to ‘IMPORTING’ to ‘IMPORTED’.
Galv renames some columns in the data files to make them easier to work with.
This process is called ‘mapping’.
You can create your own mappings or use the default mappings provided by Galv.
Where there’s a mapping that works best for a particular file, Galv will automatically use it to import the data.
Hopefully you’ll see some files imported and mapped on the Files page.
They should be accompanied by an image that shows a preview of the data.
You can click on the File to see the data in more detail, and download the dataset.
To download the dataset, expand the card for an IMPORTED File, click one of its ‘Parquet partitions’, and then click the ‘Download’ button.
You’ll see that some columns have been renamed to match Galv’s naming conventions: ElapsedTime_s for the primary time column, and Voltage_V and Current_A for the primary data columns.
Data are only as good as the metadata that describes them, so remember to add metadata to the dataset.
5 - Reference
Low level reference docs for your project.
This is a placeholder page that shows you how to use this template site.
If your project has an API, configuration, or other reference - anything that users need to look up that’s at an even lower level than a single task - put (or link to it) here. You can serve and link to generated reference docs created using Doxygen,
Javadoc, or other doc generation tools by putting them in your static/ directory. Find out more in Adding static content. For OpenAPI reference, Docsy also provides a Swagger UI layout and shortcode that renders Swagger UI using any OpenAPI YAML or JSON file as source.
5.1 - Parameter Reference
A short lead description about this content page. It can be bold or italic and can be split over multiple paragraphs.
This is a placeholder page. Replace it with your own content.
Text can be bold, italic, or strikethrough. Links should be blue with no underlines (unless hovered over).
There should be whitespace between paragraphs. Vape migas chillwave sriracha poutine try-hard distillery. Tattooed shabby chic small batch, pabst art party heirloom letterpress air plant pop-up. Sustainable chia skateboard art party banjo cardigan normcore affogato vexillologist quinoa meggings man bun master cleanse shoreditch readymade. Yuccie prism four dollar toast tbh cardigan iPhone, tumblr listicle live-edge VHS. Pug lyft normcore hot chicken biodiesel, actually keffiyeh thundercats photo booth pour-over twee fam food truck microdosing banh mi. Vice activated charcoal raclette unicorn live-edge post-ironic. Heirloom vexillologist coloring book, beard deep v letterpress echo park humblebrag tilde.
90’s four loko seitan photo booth gochujang freegan tumeric listicle fam ugh humblebrag. Bespoke leggings gastropub, biodiesel brunch pug fashion axe meh swag art party neutra deep v chia. Enamel pin fanny pack knausgaard tofu, artisan cronut hammock meditation occupy master cleanse chartreuse lumbersexual. Kombucha kogi viral truffaut synth distillery single-origin coffee ugh slow-carb marfa selfies. Pitchfork schlitz semiotics fanny pack, ugh artisan vegan vaporware hexagon. Polaroid fixie post-ironic venmo wolf ramps kale chips.
There should be no margin above this first sentence.
Blockquotes should be a lighter gray with a border along the left side in the secondary color.
There should be no margin below this final sentence.
This is a normal paragraph following a header. Knausgaard kale chips snackwave microdosing cronut copper mug swag synth bitters letterpress glossier craft beer. Mumblecore bushwick authentic gochujang vegan chambray meditation jean shorts irony. Viral farm-to-table kale chips, pork belly palo santo distillery activated charcoal aesthetic jianbing air plant woke lomo VHS organic. Tattooed locavore succulents heirloom, small batch sriracha echo park DIY af. Shaman you probably haven’t heard of them copper mug, crucifix green juice vape single-origin coffee brunch actually. Mustache etsy vexillologist raclette authentic fam. Tousled beard humblebrag asymmetrical. I love turkey, I love my job, I love my friends, I love Chardonnay!
Deae legum paulatimque terra, non vos mutata tacet: dic. Vocant docuique me plumas fila quin afuerunt copia haec o neque.
On big screens, paragraphs and headings should not take up the full container width, but we want tables, code blocks and similar to take the full width.
Scenester tumeric pickled, authentic crucifix post-ironic fam freegan VHS pork belly 8-bit yuccie PBR&B. I love this life we live in.
This is a blockquote following a header. Bacon ipsum dolor sit amet t-bone doner shank drumstick, pork belly porchetta chuck sausage brisket ham hock rump pig. Chuck kielbasa leberkas, pork bresaola ham hock filet mignon cow shoulder short ribs biltong.
This is a code block following a header.
Next level leggings before they sold out, PBR&B church-key shaman echo park. Kale chips occupy godard whatever pop-up freegan pork belly selfies. Gastropub Belinda subway tile woke post-ironic seitan. Shabby chic man bun semiotics vape, chia messenger bag plaid cardigan.
- This is an unordered list following a header.
- This is an unordered list following a header.
- This is an unordered list following a header.
- This is an ordered list following a header.
- This is an ordered list following a header.
- This is an ordered list following a header.
| What | Follows |
|---|
| A table | A header |
| A table | A header |
| A table | A header |
There’s a horizontal rule above and below this.
Here is an unordered list:
- Liverpool F.C.
- Chelsea F.C.
- Manchester United F.C.
And an ordered list:
- Michael Brecker
- Seamus Blake
- Branford Marsalis
And an unordered task list:
And a “mixed” task list:
And a nested list:
- Jackson 5
- Michael
- Tito
- Jackie
- Marlon
- Jermaine
- TMNT
- Leonardo
- Michelangelo
- Donatello
- Raphael
Definition lists can be used with Markdown syntax. Definition headers are bold.
- Name
- Godzilla
- Born
- 1952
- Birthplace
- Japan
- Color
- Green
Tables should have bold headings and alternating shaded rows.
| Artist | Album | Year |
|---|
| Michael Jackson | Thriller | 1982 |
| Prince | Purple Rain | 1984 |
| Beastie Boys | License to Ill | 1986 |
If a table is too wide, it should scroll horizontally.
| Artist | Album | Year | Label | Awards | Songs |
|---|
| Michael Jackson | Thriller | 1982 | Epic Records | Grammy Award for Album of the Year, American Music Award for Favorite Pop/Rock Album, American Music Award for Favorite Soul/R&B Album, Brit Award for Best Selling Album, Grammy Award for Best Engineered Album, Non-Classical | Wanna Be Startin’ Somethin’, Baby Be Mine, The Girl Is Mine, Thriller, Beat It, Billie Jean, Human Nature, P.Y.T. (Pretty Young Thing), The Lady in My Life |
| Prince | Purple Rain | 1984 | Warner Brothers Records | Grammy Award for Best Score Soundtrack for Visual Media, American Music Award for Favorite Pop/Rock Album, American Music Award for Favorite Soul/R&B Album, Brit Award for Best Soundtrack/Cast Recording, Grammy Award for Best Rock Performance by a Duo or Group with Vocal | Let’s Go Crazy, Take Me With U, The Beautiful Ones, Computer Blue, Darling Nikki, When Doves Cry, I Would Die 4 U, Baby I’m a Star, Purple Rain |
| Beastie Boys | License to Ill | 1986 | Mercury Records | noawardsbutthistablecelliswide | Rhymin & Stealin, The New Style, She’s Crafty, Posse in Effect, Slow Ride, Girls, (You Gotta) Fight for Your Right, No Sleep Till Brooklyn, Paul Revere, Hold It Now, Hit It, Brass Monkey, Slow and Low, Time to Get Ill |
Code snippets like var foo = "bar"; can be shown inline.
Also, this should vertically align with thisand this.
Code can also be shown in a block element.
foo := "bar";
bar := "foo";
Code can also use syntax highlighting.
func main() {
  input := `var foo = "bar";`

  lexer := lexers.Get("javascript")
  iterator, _ := lexer.Tokenise(nil, input)
  style := styles.Get("github")
  formatter := html.New(html.WithLineNumbers())

  var buff bytes.Buffer
  formatter.Format(&buff, style, iterator)

  fmt.Println(buff.String())
}
Long, single-line code blocks should not wrap. They should horizontally scroll if they are too long. This line should be long enough to demonstrate this.
Inline code inside table cells should still be distinguishable.
| Language | Code |
|---|
| Javascript | var foo = "bar"; |
| Ruby | foo = "bar"{ |
Small images should be shown at their actual size.

Large images should always scale down and fit in the content container.

The photo above of the Spruce Picea abies shoot with foliage buds: Bjørn Erik Pedersen, CC-BY-SA.
Components
Alerts
This is an alert.
Note
This is an alert with a title.Note
This is an alert with a title and Markdown.This is a successful alert.
This is a warning.
Warning
This is a warning with a title.Another Heading
6 - Contribution Guidelines
How to contribute to the docs
These basic sample guidelines assume that your Docsy site is deployed using Netlify and your files are stored in GitHub. You can use the guidelines “as is” or adapt them with your own instructions: for example, other deployment options, information about your doc project’s file structure, project-specific review guidelines, versioning guidelines, or any other information your users might find useful when updating your site. Kubeflow has a great example.
Don’t forget to link to your own doc repo rather than our example site! Also make sure users can find these guidelines from your doc repo README: either add them there and link to them from this page, add them here and link to them from the README, or include them in both locations.
We use Hugo to format and generate our website, the
Docsy theme for styling and site structure,
and Netlify to manage the deployment of the site.
Hugo is an open-source static site generator that provides us with templates,
content organisation in a standard directory structure, and a website generation
engine. You write the pages in Markdown (or HTML if you want), and Hugo wraps them up into a website.
All submissions, including submissions by project members, require review. We
use GitHub pull requests for this purpose. Consult
GitHub Help for more
information on using pull requests.
Quick start with Netlify
Here’s a quick guide to updating the docs. It assumes you’re familiar with the
GitHub workflow and you’re happy to use the automated preview of your doc
updates:
- Fork the Goldydocs repo on GitHub.
- Make your changes and send a pull request (PR).
- If you’re not yet ready for a review, add “WIP” to the PR name to indicate
it’s a work in progress. (Don’t add the Hugo property
“draft = true” to the page front matter, because that prevents the
auto-deployment of the content preview described in the next point.)
- Wait for the automated PR workflow to do some checks. When it’s ready,
you should see a comment like this: deploy/netlify — Deploy preview ready!
- Click Details to the right of “Deploy preview ready” to see a preview
of your updates.
- Continue updating your doc and pushing your changes until you’re happy with
the content.
- When you’re ready for a review, add a comment to the PR, and remove any
“WIP” markers.
Updating a single page
If you’ve just spotted something you’d like to change while using the docs, Docsy has a shortcut for you:
- Click Edit this page in the top right hand corner of the page.
- If you don’t already have an up to date fork of the project repo, you are prompted to get one - click Fork this repository and propose changes or Update your Fork to get an up to date version of the project to edit. The appropriate page in your fork is displayed in edit mode.
- Follow the rest of the Quick start with Netlify process above to make, preview, and propose your changes.
Previewing your changes locally
If you want to run your own local Hugo server to preview your changes as you work:
Follow the instructions in Getting started to install Hugo and any other tools you need. You’ll need at least Hugo version 0.45 (we recommend using the most recent available version), and it must be the extended version, which supports SCSS.
Fork the Goldydocs repo repo into your own project, then create a local copy using git clone. Don’t forget to use --recurse-submodules or you won’t pull down some of the code you need to generate a working site.
git clone --recurse-submodules --depth 1 https://github.com/google/docsy-example.git
Run hugo server in the site root directory. By default your site will be available at http://localhost:1313/. Now that you’re serving your site locally, Hugo will watch for changes to the content and automatically refresh your site.
Continue with the usual GitHub workflow to edit files, commit them, push the
changes up to your fork, and create a pull request.
Creating an issue
If you’ve found a problem in the docs, but you’re not sure how to fix it yourself, please create an issue in the Goldydocs repo. You can also create an issue about a specific page by clicking the Create Issue button in the top right hand corner of the page.
Useful resources


